Creating your own Song Context Components

As a beaTunes user you know that the matching song table and the Amazon song info panel are integral parts of the application. Both are hosted in the same space, right below the main song table. beaTunes' new plugin API makes it simple to write additional, custom components for the same space. I'd like to show you with a simple example how it's done.
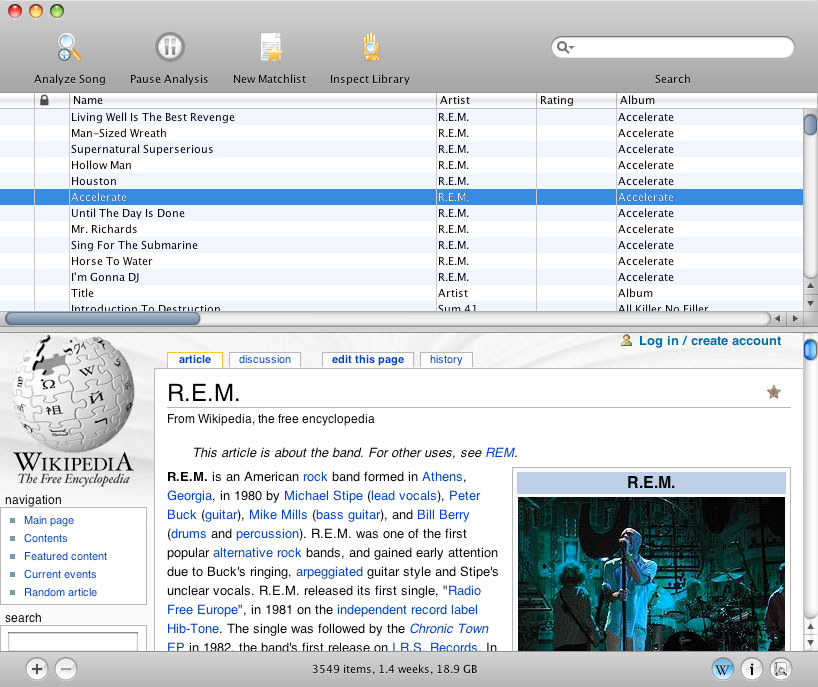
The idea of this plugin is to show the Wikipedia page corresponding to the selected song's artist. Because Java's JEditorPane has a rather poor HTML rendering performance and JWebPane is definitely not available on the Mac, we will use JDIC as browser component (this example will only run on OS X, the concept is the same though for Windows). Note, that the Mac version of JDIC is rather old and really only an alpha version. So expect unnecessary repaints and other visual artifacts. But this is not about the perfect embedded browser for Java, it's about custom SongContextComponents.
Subclassing SongContextComponent
Our Wikipedia component has to subclass com.tagtraum.beatunes.songtable.SongContextComponent. This superclass does most of the work for us. We only have to implement a couple of methods. Let's start with the simple stuff. Just like any other well behaved plugin, our component should have an id.
public String getId() {
    return "songcontextcomponent.wikipedia";
}
Furthermore, it needs to specify a status label text, which for our purposes may always remain empty (future versions of the API won't require this anymore).
public String getStatusLabel() {
    return null;
}
Setting up the UI
To set up the component itself, we have to declare a couple of fields and instantiate the UI component in the constructor. Also, as part of the interface, we have to implement the getComponent() method, which returns the JComponent that is going to be integrated into beaTunes' UI. Here's how it's done:
private static final Logger LOG = LogManager.getLogger(Wikipedia.class);

// the component we hand to beaTunes
private JPanel component;
// the actual browser component
private IWebBrowser webBrowser;
// we want to remember the last artist we've shown
// to avoid reloading the same page
private String lastArtist;
// page loading should be done in a separate thread, not the event thread
private ExecutorService executorService;
// loading will be done in a Future, which can be cancelled
private Future future;


public Wikipedia(final BeaTunes beaTunes) {
    super(beaTunes);
    // register the show hide action for this SongContextComponent
    setShowHideActionId("wikipedia.show.hide");
    this.executorService = Executors.newSingleThreadExecutor(
        PriorityThreadFactory.getInstance(Thread.MIN_PRIORITY));
    this.webBrowser = BrowserEngineManager.instance().getActiveEngine().getWebBrowser();
    // webBrowser already has scrollbars, therefore a JPanel is good enough as component
    this.component = new JPanel(new BorderLayout());
    this.component.add((Component) webBrowser, BorderLayout.CENTER);
}

public JComponent getComponent() {
    return component;
}
Reacting to song selections
Now that we have set up the webBrowser component, the only thing that's left to do, is to put some content into the browser window. To do so, we implement the update(Song) method. This method is called when the user selects a song in the main song table. To be precise, it is not called right away when the user selects a song, but with a little delay. This allows us to ignore the selection, should the user just scroll down a list of songs using the cursor keys.
public void update(final Song song) {
    // sanity checks
    if (song == null) return;
    if (song.getArtist() == null || song.getArtist().length() == 0) return;
    final String artist = song.getAlbumArtist() != null
            && song.getAlbumArtist().length() != 0
            ? song.getAlbumArtist() : song.getArtist();
    // is this what we just showed?
    if (artist.equals(lastArtist)) return;
    lastArtist = artist;
    showArtist(artist);
}

private void showArtist(final String artist) {
    if (future != null) {
        future.cancel(true);
    }
    future = executorService.submit(new Runnable() {
        public void run() {
            try {
                // respect the user's language
                final String language = getApplication().getLocale().getLanguage();
                final URL url = new URL("http://" + language
                        + ".wikipedia.org/wiki/Special:Search?search="
                        + URLEncoder.encode(artist, "UTF-8") + "&go=Go");
                webBrowser.setURL(url);
            } catch (IOException e) {
               LOG.error("Unable to open page for " + artist, e);
            }
        }
    });
}
That's basically it.
Showing some Action
Well, almost... there are some things we still need to take care of. To start with, we of course have to provide a plugin.xml file to register the class. But more importantly, we have to provide some Action to show and hide our Wikipedia component. To do so, we subclass com.tagtraum.beatunes.action.standard.SongContextComponentShowHideAction. Here's the class:
public class ShowHideWikipediaAction extends SongContextComponentShowHideAction {

    public ShowHideWikipediaAction(final BeaTunes beaTunes) {
        super(beaTunes);
        putValue(Action.ACCELERATOR_KEY, KeyStroke.getKeyStroke(KeyEvent.VK_W,
                Toolkit.getDefaultToolkit().getMenuShortcutKeyMask()
                | InputEvent.SHIFT_MASK));
    }

    public void init() {
        // always call super.init() to make sure the action gets enabled/disabled properly
        super.init();
        putValue(Action.NAME, "Show Artist Info");
        putValue(Action.SHORT_DESCRIPTION, "Shows artist info on Wikipedia");
        putValue(Action.SMALL_ICON,
            new ImageIcon(Wikipedia.class.getResource("wikipedia.png")));
        putValue(BaseAction.SELECTED_ICON,
            new ImageIcon(Wikipedia.class.getResource("wikipedia_selected.png")));
        putValue(BaseAction.DISABLED_ICON,
            new ImageIcon(Wikipedia.class.getResource("wikipedia_disabled.png")));
        putValue(BaseAction.DISABLED_SELECTED_ICON,
            new ImageIcon(Wikipedia.class.getResource("wikipedia_disabled.png")));
    }

    public String getId() {
        // this is the id we reference in the Wikipedia class
        return "wikipedia.show.hide";
    }

    public ActionLocation[] getActionLocations() {
        return new ActionLocation[] {
                // add to Edit menu
                new RelativeActionLocation(BeaTunesUIRegion.EDIT_MENU,
                    RelativeActionLocation.RelativePosition.BEFORE, "tree.show.hide"),
                // add as first (index 0) item to the lower right button panel
                new AbsoluteActionLocation(BeaTunesUIRegion.LOWER_RIGHT_BUTTON_PANEL, 0)
        };
    }
}
And here is the very simple plugin.xml that needs to be placed in the META-INF directory of our jar.
<?xml version="1.0" encoding="UTF-8" ?>
<!-- Contains a list of plugins to be instantiated by beaTunes -->
<plugins>
    <!-- SongContextComponent -->
    <plugin class="com.beatunes.wikipedia.Wikipedia"/>
    <!-- Actions -->
    <plugin class="com.beatunes.wikipedia.ShowHideWikipediaAction"/>
</plugins>
Zip it!
Since the plugin uses third party libraries, we can't just put everything in one jar and place it in the plugin folder. Instead, we have to create a folder with a subfolder called lib. Into the lib folder we place the plugin's jar, jdic.jar and the native library libjdic.jnilib (both from JDIC). Then we zip the whole thing up.
In essence, the directory structure looks like this:
/lib/wikipedia-1.0.0.jar
    /jdic.jar
    /libjdic.jnilib
For beaTunes 2, the plugin classloader is configured to add all jars in the lib directory, and the classes subdirectory itself, should it exist. Note that plugins are not isolated from each other or from beaTunes, so library and/or class version conflicts are something to stay aware of.
You can download the full source for this example from here and the ready to go binary from here.
Labels: API, Early Access, OS X, Plugin, Wikipedia
posted at 17:29
![]()
![]()
0 Comments:
Post a Comment
<< Home